Nailing the Reverse Sear
The Reverse Sear Brought Home
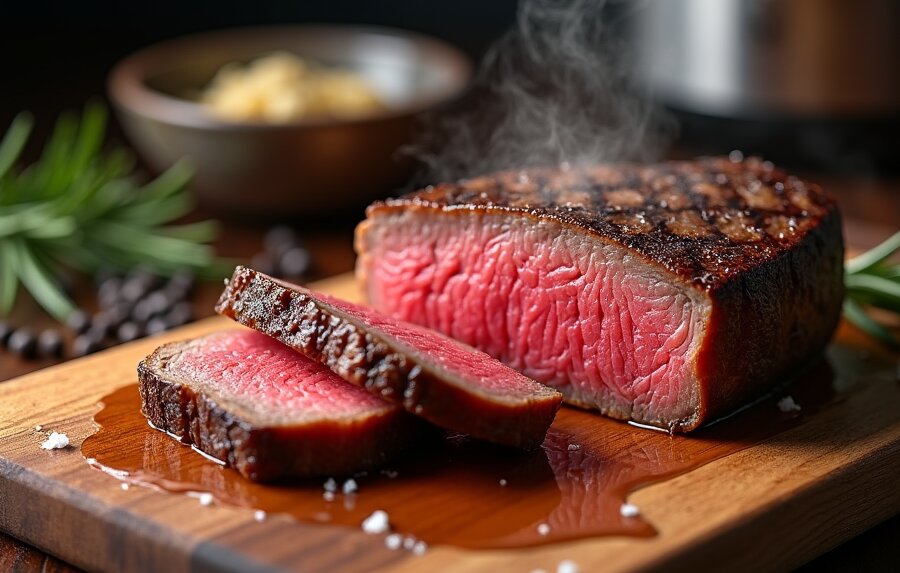
Let’s talk about the reverse sear sous vide—my secret weapon for getting that steakhouse perfection right at home. This method, cooked up by America’s Test Kitchen, flips the script on traditional steak cooking. It’s a two-parter: first, gently cook the steak in the oven or sous vide, then finish it off in a ripping-hot pan. The magic? Even, juicy meat with a knockout crust. This trick has totally changed my kitchen game.
Why Reverse Sear?
Here’s why the reverse sear is an absolute game-changer over old-school techniques:
Even Cooking: Forget dry edges and an undercooked middle. Cooking the steak slowly at a low temp makes sure it’s perfect from edge to edge, every time.
Tenderness: Slow and low cooking lets the meat relax, making every bite as tender as your last. Thick steaks especially benefit from this.
Juiciness: It’s all about the juice. When cooked evenly, the steak holds onto its moisture, so you get a mouthful of flavor in every bite.
Crust: That final blast of high heat caramelizes the outside to give you that tasty, crispy crust. It’s like steak candy.
In short, the reverse sear takes the guesswork out of grilling. It delivers consistent, juicy, tender steaks. Want to know the step-by-step? Check out my go-to reverse sear steak recipe.
| Benefit | What It Means |
|---|---|
| Even Cooking | Perfect doneness throughout |
| Tenderness | Softer, melt-in-your-mouth texture |
| Juiciness | Keeps every drop of delicious juice |
| Perfect Crust | Crisp, flavorful outside |
Whether you’re just getting your feet wet or you’ve got grill marks in your DNA, the reverse sear can totally up your game. For tips on using a cast iron skillet to get that sear just right, hit up my cast iron reverse sear guide.
Mastering this technique makes you the hero of the BBQ. Who doesn’t want that?
Picking Perfect Cuts of Meat
Getting the right meat is key to nailing the reverse sear technique. Choose wisely, and you’ll be serving up steakhouse-quality dishes in your own backyard.
Best Steaks for Reverse Searing
Thick-cut steaks—around 1.5 inches or more—are your best bet for reverse searing. Some of my go-to choices are:
- Filet Mignon
- New York Strip
- Porterhouse
- Ribeye
- T-bone
- Tomahawk
- Tri-tip
These cuts are ideal because they cook evenly and stay juicy and tender. The reverse sear lets you control the doneness more consistently compared to blasting it with high heat right away (Jessica Gavin, Serious Eats).
| Steak Cut | Ideal Thickness | Best Doneness |
|---|---|---|
| Filet Mignon | 1.5 inches+ | Medium-rare to medium |
| New York Strip | 1.5 inches+ | Medium-rare |
| Porterhouse | 1.5 inches+ | Medium-rare |
| Ribeye | 1.5 inches+ | Medium-rare |
| T-bone | 1.5 inches+ | Medium-rare |
| Tomahawk | 1.5 inches+ | Medium-rare |
| Tri-tip | 1.5 inches+ | Medium to medium-rare |
Exploring Flavors and Textures
Different cuts offer different eating experiences. For instance, ribeye’s rich marbling adds tons of flavor, while filet mignon is famously tender. Wagyu steak, with its marbling, reaches melt-in-your-mouth perfection at medium-rare to medium (WebstaurantStore).
Choosing the right cut is the first step in mastering the reverse sear method. I always go for thick, flavorful steaks to ensure the best outcome. If you want to dive deeper into the cooking process, check out my reverse sear guide and the detailed recipe for more tips.

Transform Your Steak Game with Reverse Searing
Mastering the reverse sear method has totally changed how I cook steak. This two-step process involves slow cooking first, then a quick sear at high heat, kinda like turning a plain steak into restaurant-quality magic.
Start with a Slow Cook
First things first, crank your oven to 275°F. This low temp lets the steak cook gently, giving you even doneness all the way through. I slap my steak on a wire rack sitting over a baking sheet — you want good air circulation. Most steaks need about 15 to 25 minutes in the oven, depending on thickness. And during this time, enzymes like cathepsin start working, making the meat all tender and delicious (Jessica Gavin).
Here’s a handy table to help you out:
| Steak Thickness | Cooking Time |
|---|---|
| 1 inch | 15 minutes |
| 1.5 inches | 20 minutes |
| 2 inches | 25 minutes |
After the slow cook, grab a meat thermometer and check the internal temp, aiming for about 10°F lower than your target doneness. This sets you up for a perfect finish during the searing.
Nail That Sear
Once your steak hits the right internal temp, pull it out of the oven and let it chill for a few minutes. This relaxes the juices, making the steak juicier.
Heat your cast iron skillet on high until it’s just smoking. High heat gives you that crispy crust and locks in those precious juices. Toss in some oil with a high smoke point like grapeseed or avocado oil.
Searing takes only about 1 to 2 minutes per side. This gives the steak a beautiful brown crust without wrecking the inside. Press down with a spatula during the sear for even contact.
For extra help, see my guides on how to reverse sear a steak and my go-to reverse sear steak recipe. If cast iron is your jam, check out my tips on reverse sear cast iron too.
Reverse searing has revolutionized my steak game. Now, I get perfectly cooked, mouth-watering steaks every time. Happy cooking!
Elevating Steak: Tricks & Tastes
The reverse sear method didn’t just make my steaks better—it reshaped how I think about flavor. Two tricks that I swear by? Adding that smoky goodness and nailing caramelization. These moves turn a regular steak into a showstopper.
Get That Smoky Goodness
If you’re all about that smoky taste, reverse searing on a grill is your new best friend. By cooking the steak slowly on an indirect heat zone, I get it to the perfect temp (100-125°F inside) before finishing with a high-heat sear. This method locks in a smoky flavor that’s out of this world.
I’m a big fan of using wood chips for that extra touch. Soak the chips in water for about half an hour so they smolder instead of burn. Here’s a cheat sheet on how long to soak and smoke:
| Wood Type | Soak Time | Smoking Time |
|---|---|---|
| Hickory | 30 minutes | 15-30 minutes |
| Mesquite | 30 minutes | 10-20 minutes |
| Applewood | 30 minutes | 30-40 minutes |
| Cherrywood | 30 minutes | 20-30 minutes |
Mixing up different woods can keep things exciting.
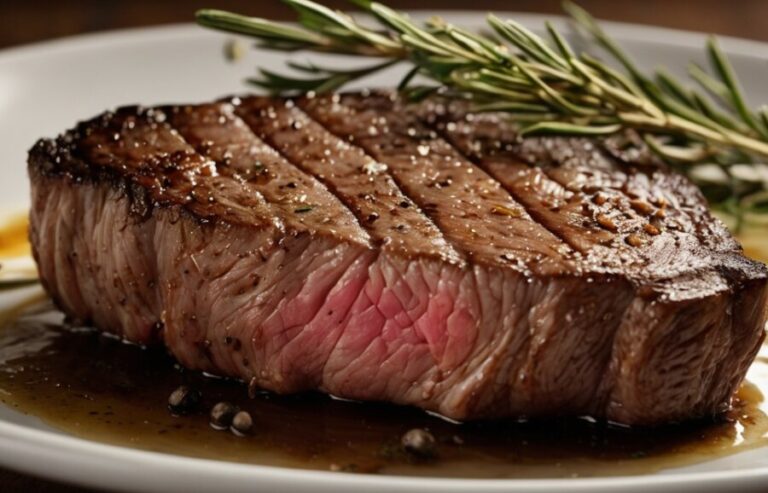
Mastering Caramelization
Caramelization is pure magic. It’s the process where heat turns the sugar on the steak’s surface into a tasty, brown crust. This crust not only adds flavor but also seals in juices. Reverse searing is perfect for this because the steak cooks low and slow before a high-heat finish.
To get that perfect caramelization, it’s crucial to start with a dry steak. Any moisture can mess with the crust. Here’s my simple checklist:
- Pat the Steak Dry: Use paper towels to get rid of any moisture.
- Season Well: Salt not only boosts flavor but also pulls moisture out, helping with browning.
- Get Your Pan Hot: Whether it’s cast iron or stainless steel, make sure it’s hot enough to sizzle when the steak hits it.
- Keep an Eye on the Sear: Look for a lovely golden-brown crust—that’s when you know caramelization is on point.
With these tricks, reverse searing isn’t just cooking anymore; it’s an adventure in taste and texture. Ready to try it out? Check out how to reverse sear a steak and my reverse sear steak recipe for more tips. Happy cooking!
Sous Vide Cooking for Consistency
What’s the Deal with Sous Vide?
If you’ve ever wanted to nail that perfect steak every time, sous vide is your new best friend. Think of it as a hot tub for your meat – but way more delicious. You seal your food in a bag, dunk it in a water bath, and let an immersion circulator keep everything at just the right temp. The result? Steak that’s cooked exactly to your liking, with zero guesswork involved.
Why Go Sous Vide?
First up, sous vide means you’ll never overcook your food. The water bath keeps everything cozy and at the perfect temperature, so your steak stays juicy and bursting with flavor every single time. No more dry, sad meat. Trust me, it’s a game-changer.
And it’s not just about the steaks. Sous vide is fantastic for beef, lamb, chicken – basically any protein. You can bring your food to the perfect temperature and hold it there for hours. This is a lifesaver on busy days. Set it up, forget about it, and spend more time with your friends instead of stressing out in the kitchen.
I’ve got to give a shoutout to my trusty Anova Culinary Precision Cooker. This little gadget keeps everything precise and consistent, making my sous vide adventures foolproof. Cooks in a water bath for anywhere from one to four hours, then just a quick sear – and voila, you’re a gourmet chef.
Meal prep? Sous vide has got you. I can cook up a whole week’s worth of proteins and veggies, ready to be seared or sautéed when I need them. It’s incredibly handy for delicate dishes, like soft-boiled eggs, especially when feeding a crowd. You’ll make Gordon Ramsay jealous with how easy and foolproof this method is.
For the full scoop on how I use sous vide with the reverse sear technique, check out my article on how to reverse sear a steak. Also, don’t miss my reverse sear steak recipe to get started on this amazing cooking method.
Perfecting the Finish
Searing After Sous Vide
Cooking a steak with sous vide is like giving it a spa day – it’s pampered until it’s juicy and tender. But, a great sear is what brings your steak to life. Think of it as getting that perfect tan. I crank up my cast iron skillet on high until it’s blazing hot. That’s the secret sauce for the Maillard reaction – the chemical magic that makes your steak’s crust a flavor bomb.
Here’s the game plan: I yank my steak out of the bag and give it a good pat-down with paper towels. This step is key because moisture is the enemy of browning. Next, I splash a bit of high smoke-point oil into the skillet – canola or avocado are my go-tos – just before plopping the steak in. This setup is pure gold for nailing that sear and sealing in flavors.
| Cooking Method | Temp (°F) | Time |
|---|---|---|
| Sous Vide (Steak) | 130-145 | 1-4 hours |
| Sear | 500+ | 1-2 mins per side |
Tips for a Flavorful Crust
Turning your steak into a flavor sensation is a mix of science and art. Here’s my cheat sheet for nailing it every time:
Keep It Dry: Before searing, make sure your steak is bone dry. This stops steam from sabotaging your sear.
Pick the Right Oil: High smoke-point oils like canola or avocado are your buddies here to dodge burnt vibes.
Season Like You Mean It: A quick sprinkle of salt and pepper before searing ramps up the flavor. Trust me, it’s worth it.
Give It Space: If you’re cooking a herd of steaks, give them room in the pan. Tight quarters lead to steaming, not searing.
Baste for the Win: In the last searing minute, toss in some butter with thyme or rosemary. A quick baste with a spoon adds that rich, glossy finish.
Stick to these tips, and you’ll be serving up steaks that rival any fancy steakhouse. Wanna dive buzz on how? Check out my detailed guides on how to reverse sear a steak and reverse sear steak method for step-by-step wizardry.
One Comment
Comments are closed.