Our evaluations and product assessments are conducted using a thorough and unbiased approach. Should you choose to buy any items through our provided links, we might receive a commission Read our disclosures.
Troubleshooting Rotisserie Flare Ups
Flare-ups are like that annoying friend who shows up uninvited to your rotisserie party. But guess what? With some savvy tricks up your sleeve, you can handle fat drippings and fine-tune your pre-cooking game to keep those flames in check.
Catching Fat Drippings
Flare-ups mainly happen when fat, oil, or sauce hits the coals or burners. Leaving the lid open while you’re searing juicy meats or cooking on a windy day makes this worse. So, what’s the fix? I always slap a drip pan under the grates, especially when using rotisserie attachments. This handy pan snags those sneaky drippings before they can even think about causing trouble, making your grilling drama-free and cleanup a breeze.
| What Causes Flare-Ups | How to Prevent Them |
|---|---|
| Fat, oil, or marinade drips | Slap on a drip pan |
| Open lid while searing | Keep that lid closed |
| Windy cooking days | Grill in a sheltered spot |
This way, I can focus on the important stuff—cooking up some mouth-watering grilled goodness without the flames being party crashers.
Pre-Cooking Tweaks
When it comes to avoiding rotisserie flare-ups, changing how you cook can make a big difference. Smaller pieces of meat cook quicker, lowering the heat exposure and cutting down on those nasty carcinogens. For bigger cuts, start them off in the microwave, oven, or on the stove. This pre-cooking lowers the overall grill time, giving you perfectly cooked meat minus the flares.
I also make sure to fully thaw my meat before grilling. This ensures evenly cooked meat and keeps flare-ups at bay, delivering that perfect grill experience every time.
With these tricks up my sleeve, my grill sessions are fuss-free and more about fun than firefighting. If you run into other grilling issues like a rotisserie motor being lazy or burner going rogue, check out the links for more handy tips.
Fat Trimming and Marinating
Trimming Excess Fat
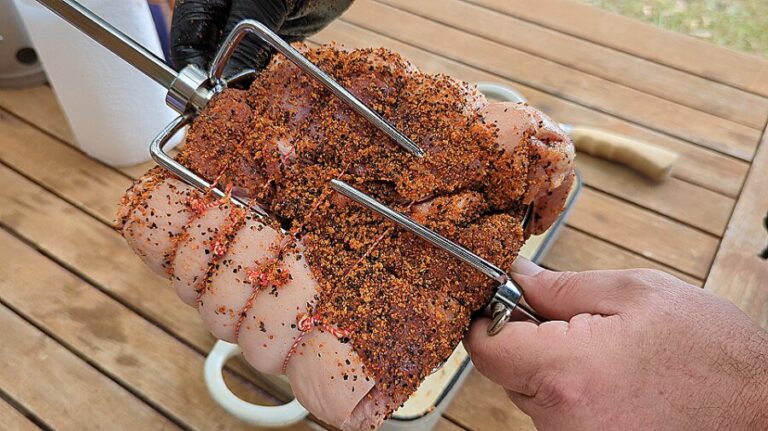
When I prep meat for the rotisserie, I always make it a point to trim off the excess fat. Overlook this step, and you’re more likely to encounter those annoying flare-ups while grilling. Fattier foods drip more, leading to flames that can mess up your meal and leave your meat tasting charred and smokey (Summerset Grills).
Here’s how I trim different types of meat:
| Meat Type | How Much Fat to Trim |
|---|---|
| Chicken | Leave about 1/4 inch of skin fat |
| Pork | Take off extra layers but keep some for flavor |
| Beef | Trim to around a 1/8 inch fat layer |
| Lamb | Remove surface fat but retain a bit for taste |
Trimming fat helps me dodge those bothersome flare-ups and amps up the flavor of my meat.
Patting Dry Marinated Meat
Marinating meat is my go-to for adding that burst of flavor. But, if I’m not careful, it can cause flare-ups. Excess oils and marinades tend to drip onto the heat, igniting those fiery bursts. To avoid this, I always pat down my marinated meat with a paper towel before grilling (Summerset Grills).
This easy step cuts down the risk of flare-ups and helps me get that flawless sear without the unwelcome flames.
Using these tips, I make grilling a more enjoyable experience, letting me focus on the fun of outdoor cooking. If you want more tips on grilling woes, check out my guides on fixing rotisserie uneven browning and rotisserie meat drying out.

Stop Rotisserie Flare-Ups Before They Start
Getting your grill game right involves more than just tossing meat on the flames. The real magic lies in preventing those annoying flare-ups from turning your cookout into a fire dance. I’ve got a couple of practical tricks that can make your grilling safer and way more fun.
Using a Drip Pan
One of the smartest hacks is a drip pan. Place it under the grates, especially with rotisserie setups. This pan catches the fat before it hits the heat source, stopping those wild flames. Plus, cleanup later becomes a breeze.
Why a drip pan rocks:
| Benefit | What it does |
|---|---|
| Controls Flames | Catches drippings so they don’t ignite |
| Safety | Lowers fire risks while grilling |
| Cleanup | Keeps the mess in one spot |
For more cool tips on keeping those flames in check, check out this guide on fixing rotisserie burner issues.
Preheat Your Grill, Dummy!
Always, always preheat your grill. This isn’t just about a better cook. It’s also about making sure flare-ups don’t crash your party. When you preheat properly, the hot surface sears the meat fast, stopping fat from dripping and causing fires.
Quick preheating cheat sheet:
| Temp | Time |
|---|---|
| Low (200°F – 250°F) | 10 mins |
| Medium (300°F – 350°F) | 15 mins |
| High (400°F – 500°F) | 20 mins |
Remember these tips, and you’ll be flipping rotisserie like a pro in no time. For some extra help, don’t miss my articles on keeping rotisserie meat juicy or getting an even browning on rotisserie.
Happy grilling!
Specific Grill Recommendations
Kamado Rotisserie Tips
Cooking with a Kamado grill has its quirks, but once you get the hang of it, it’s a game-changer. One of the first things I learned was how crucial it is to manage flare-ups. Smaller cuts of meat are my go-to—they cook faster and there’s less chance for those pesky high-temp flare-ups. Plus, they minimize those nasty carcinogens.
If I’m feeling daring and going for a larger cut, I like to give it a head start in the microwave or oven. This way, it spends less time exposed to that intense heat, reducing flare-up chances. A word to the wise: always thaw your meat properly. Frozen meat drips fat like crazy when it hits the heat, turning your grill into a flamethrower (Cancer Center).
Preheating your grill is non-negotiable. I usually go for a low to medium heat. And I never leave my food unattended—unless I want a charred mess for dinner. Managing the charcoal is another trick. Try moving it to the front; it helps heat the grill walls more evenly. Also, placing your grill’s flu towards the rear helps with better heat distribution. Skip the foil deflector on your rotisserie; instead, push the charcoal to the back. This lets the meat rotate in and out of the direct heat, cooking evenly (Komodo Kamado Forum).
And hey, if a flare-up happens, no worries! A small drip tray on the bottom grate works wonders—catching that extra fat and keeping those flames in check.
Flame Control Strategies
Keeping your flames under control is the secret sauce to grilling. A steady temperature is key, and watching your cook like a hawk is a good habit. Drip trays are lifesavers—they catch the fat before it hits the flames, cutting down on flare-ups big time.
Another simple trick? Keep the grill covered when you’re not hovering over it. This keeps the heat in and stops those sudden temperature changes that cause flare-ups when you pop the lid.
Use these tips and tricks to make your grilling sessions both tasty and safe. If you’re running into specific issues, like your rotisserie burner acting up or uneven browning, check out our guides on troubleshooting rotisserie burner problems and fixing rotisserie uneven browning. Your grilling skills will thank you.
Keep Those Flare-Ups in Check!
Flare-ups can be a real buzzkill for your grilling adventure, but don’t fret—I’ve got some tricks up my sleeve to keep those pesky flames under control. The magic lies in two simple but effective tools: solid drip trays and flame-taming systems.
Going Strong with Drip Trays
One of my top moves is using a tough drip pan under the grates when cooking with rotisserie attachments. This little hero catches all the fat drippings before they hit the heat source, saving you from those fiery surprises and making cleanup a breeze.
Perks of Using Drip Trays:
| What’s Cool | Why It’s Cool |
|---|---|
| Stops Flare-Ups | Catches fat and oils before they combust. |
| Easy Peasy Cleanup | Keeps the grill less messy. |
| Even Stevens Cooking | Prevents sudden flames, keeping the temp steady. |
Want to avoid more flare-ups? Check out this guide.
Mastering Flame-Taming Systems
Handling fat drippings right is key. Flare-ups usually happen when fat, oil, or marinade spill onto the burners or coals. Keeping the lid shut while searing fatty foods and grilling in calm weather can help big time.
A good flame-taming system on my gas grill changes the game. These systems keep the flames in check and make grilling safer. I always go for grills known to squelch flare-ups—they make cooking more predictable and less stressful.
Handy Tips for Flame-Taming Systems:
| Handy Hint | Why It Helps |
|---|---|
| Preheat Like a Pro | Keep the grill at a steady temp. |
| Stick to Low or Medium Heat | Helps dodge flare-ups. |
| Stay on Guard | Don’t leave the grill unattended. |
Combining sturdy drip trays with a solid flame-taming system lets me grill with ease, without worrying about flare-ups crashing the party. If you’re having other grill woes, check out our posts on fixing rotisserie burner issues and keeping rotisserie meat juicy.
Now grab those tongs and enjoy a flare-up-free grilling experience!
Wood Selection Tips
Picking the right wood isn’t just about getting the fire going—it’s about flavor, heat, and a good time with friends and family. Over the years, as I’ve grilled my way through many weekends, I’ve found that hardwoods and softwoods each bring their own mojo to the cooking experience.
Hardwood vs Softwood
Your choice between hardwood and softwood makes all the difference. Hardwoods burn hotter and longer, which is just what you want for grilling and smoking. Think of woods like oak, hickory, and maple. They provide steady heat and that delightful smoky taste we love.
| Wood Type | Burn Time (Hours) | Heat Level | Smoke Output |
|---|---|---|---|
| Oak | Up to 4 | High | Low |
| Hickory | 2 – 3 | High | Strong |
| Maple | 1 – 2 | Medium | Mild |
| Pine | 1 – 2 | Low | High |
| Cedar | 1 – 2 | Low | High |
On the flip side, softwoods like pine and cedar catch fire quickly but burn out fast. This makes them less ideal for long cooks. They also smoke a lot more—sometimes too much—introducing a resinous taste that can mess with your meal’s flavor.
In my grilling escapades, I’m all about hardwoods like oak, hickory, and maple. They keep the heat going longer and add rich flavors, giving me better control, especially when dealing with flare-ups.
Fire Pit Burning Characteristics
Understanding how each wood burns helps me keep my BBQ on point. Hardwoods burn slower and give me steady, manageable heat. Oak stands out here, lasting up to four hours, perfect for those slow-cooked meals.
Softwoods might get the fire started fast, but their inconsistent burn can cause issues. Fast burns and heavy smoke can lead to unpredictable flare-ups—a nightmare when you’re trying to cook evenly. That’s why I’m always stocked with hardwoods, ready for a steady, reliable fire.
So, before your next BBQ, make sure you have the right wood ready. The perfect wood not only amps up your grilling game but also helps you manage those pesky troubleshooting rotisserie flare-ups.
Enjoy those cookouts, and remember, the right wood makes all the difference!

