Essential Tools for Homebrewing
Homebrewing beer is a wild ride, and having the right gear can make all the difference. When I first dipped my toes into homebrewing, I quickly learned that a solid beginner homebrew kit is a game-changer. Below, I’ll share the must-haves and why starter kits are a lifesaver for newbies.
Beginner Homebrew Kit Basics
A beginner homebrew kit is your all-in-one ticket to brewing beer at home. Most kits are geared towards a 5-gallon batch, which is a sweet spot for beginners. Some even offer smaller 1-gallon kits, perfect for those who want to test the waters without diving in headfirst (HomeBrewTalk).
Here’s a quick rundown of the essentials you’ll find in a beginner homebrew kit:
| Equipment | Purpose |
|---|---|
| Fermenting Bucket | Where the magic of fermentation happens |
| Bottling Bucket | For transferring and bottling your brew |
| Bottling Wand | Makes bottling a breeze |
| Bottle Capper | Seals your bottles tight |
| Auto-Siphon | Transfers liquid without adding air |
| Transfer Tubing | Moves beer between containers |
| Hydrometer | Measures the beer’s specific gravity |
| Airlock | Lets gases escape during fermentation while keeping out nasties |
| Sanitizer Solution | Keeps everything squeaky clean |
Why Starter Kits Rock
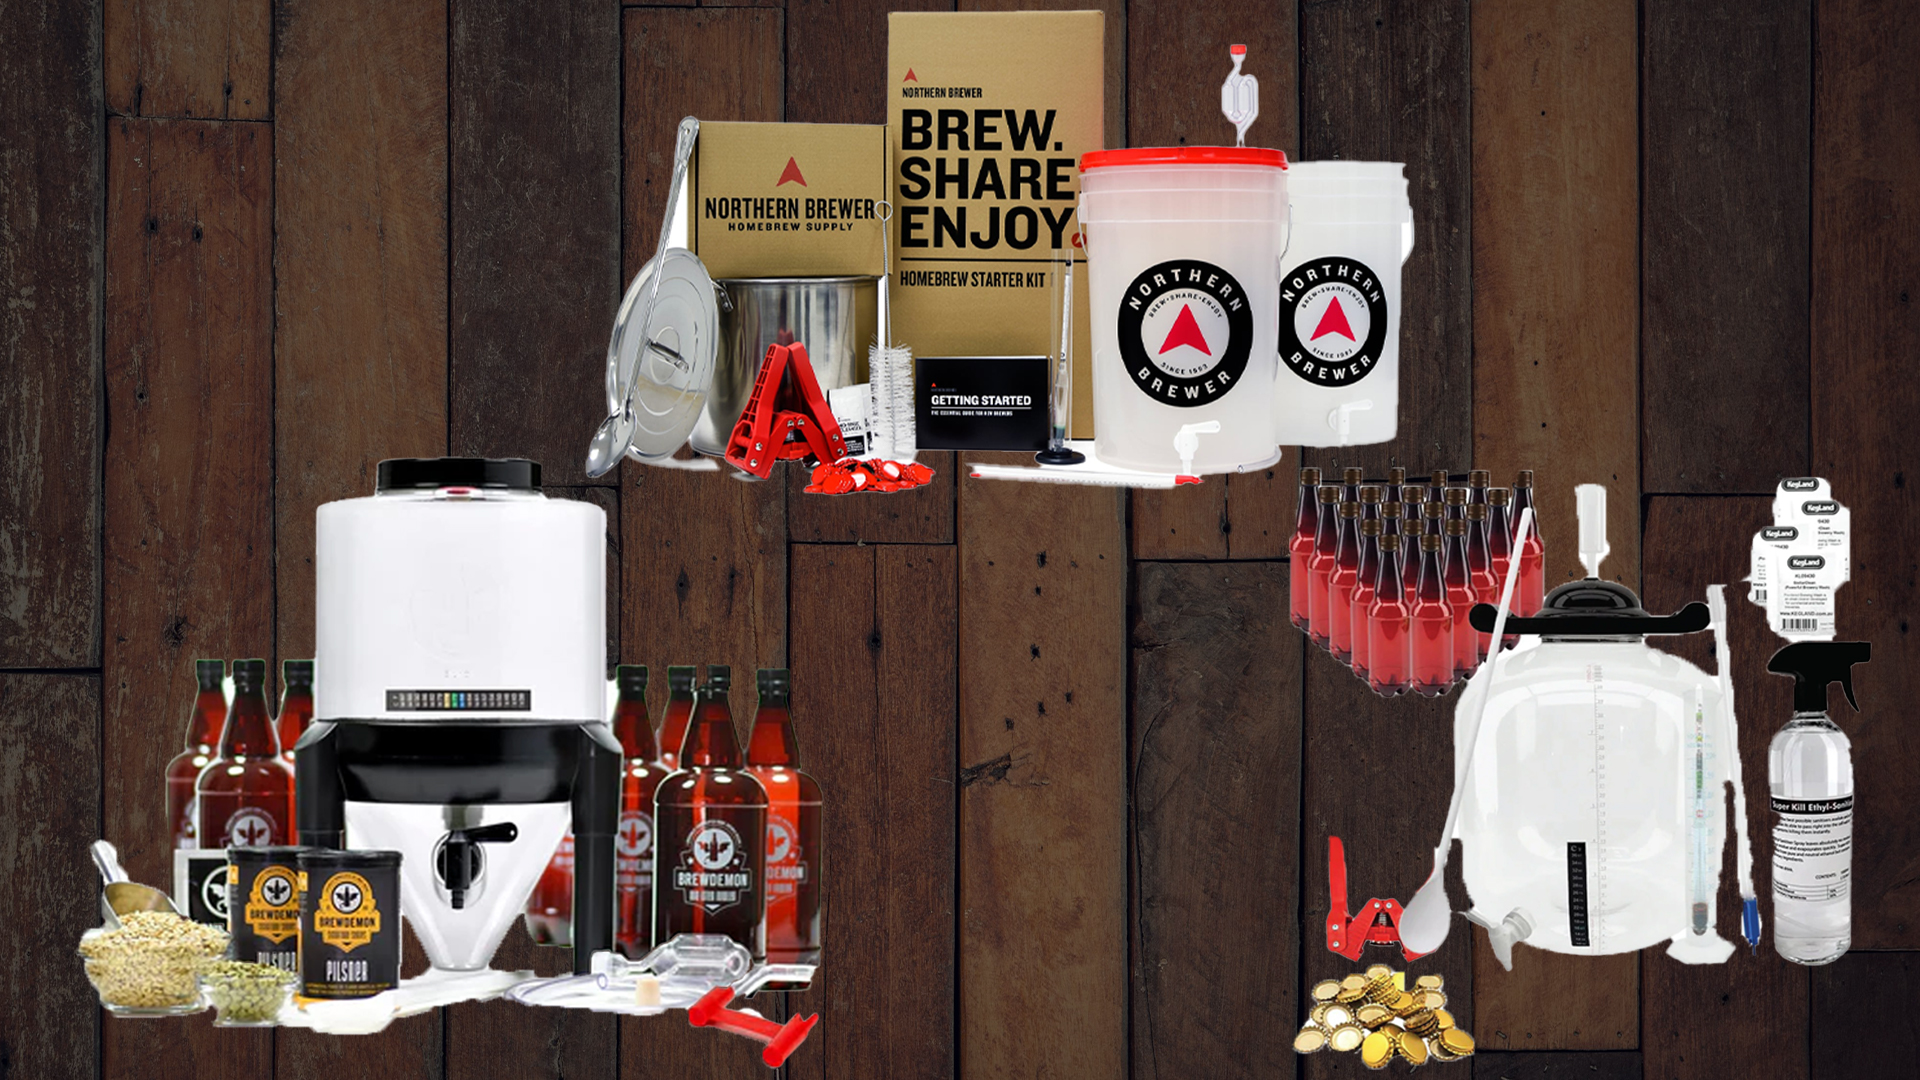
A homebrewing starter kit is a no-brainer for beginners. It packs all the gear you need for fermenting, transferring, and bottling your brew. Bundling everything together not only simplifies the process but also saves you time and cash. Many homebrew shops offer these kits as a package deal, making it a budget-friendly way to get started.
Plus, starter kits often come with instructions and recipe kits that include pre-measured ingredients, which is a godsend for newbies. This means you can jump right into brewing without any guesswork. Using a recipe kit is a fantastic way to get your feet wet in the brewing process.
Whether you’re brewing your first batch or looking to up your game, a solid beginner homebrew kit lays the groundwork for a successful brewing adventure. For more info on the gear you’ll need, check out our page on homebrewing equipment.
Gear for Brewing
When I jumped into homebrewing, I quickly realized that having the right gear was a game-changer. Here’s a rundown of the must-have tools that made brewing beer at home a breeze.
Fermenting Must-Haves
Fermentation is where the magic happens. To get started, you’ll need these essentials:
| Equipment | Purpose |
|---|---|
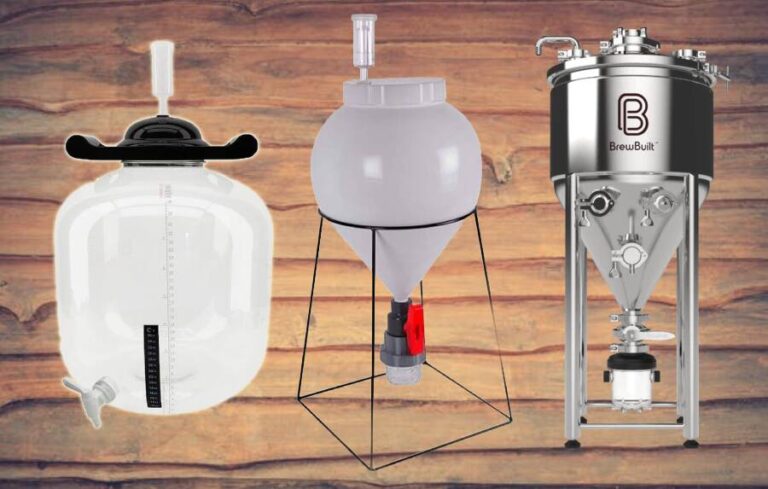
| Fermentation Bucket | This is where your wort turns into beer. It needs a tight lid and an airlock to let gas out while keeping nasties away. Check out fermentation bucket for options. |
| Carboy Fermenter | A glass or plastic vessel to watch the fermentation process. Glass is sturdier. Learn more about carboy fermenter. |
| Fermentation Airlock | Lets CO2 escape while blocking unwanted bacteria and wild yeast. More details at fermentation airlock. |
Transferring Tools
After fermentation, moving the beer to a bottling bucket is key. Here’s what you’ll need:
| Equipment | Purpose |
|---|---|
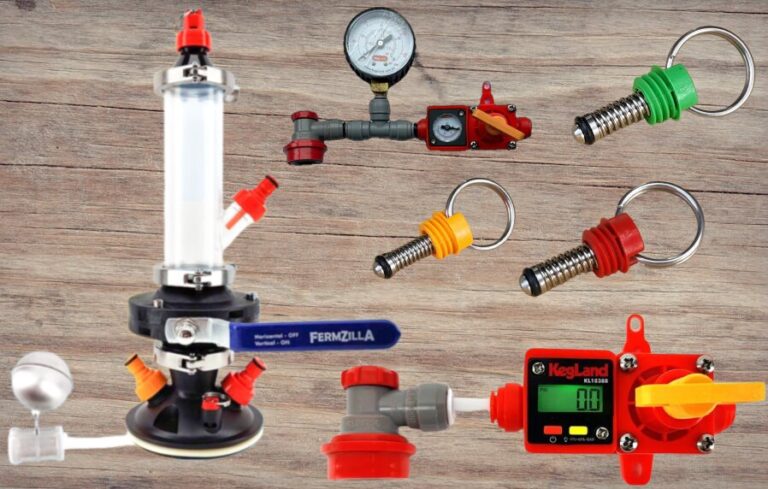
| Auto-Siphon | Makes transferring beer easy without adding oxygen. I found it on auto-siphon for beer to be a lifesaver. |
| Bottling Wand | Helps fill bottles with minimal mess and gives you control over the flow. Check out bottling wand for more info. |
Bottling Essentials
Bottling is the last step before you get to enjoy your brew. Here’s what you need:
| Equipment | Purpose |
|---|---|
| Bottling Bucket with Spigot | Makes filling bottles easy with a spigot for controlled pouring. Learn more at bottling bucket with spigot. |
| Bottle Capper | Essential for sealing bottles after filling them with beer. Read more at bottle capper for homebrewing. |
| Sanitizer | Keeping everything clean is crucial. I use a reliable sanitizer to keep my gear microbe-free. More info on sanitizer for homebrew. |
With these tools in my beginner homebrew kit, I felt ready to make some tasty brews. Each piece of gear is vital to the brewing process, ensuring every batch is top-notch. For a full list of what I used, check out our guide on homebrewing equipment.
Key Ingredients for Homebrewing
When I first dipped my toes into homebrewing, getting a handle on the main ingredients was a game-changer. Each one plays a crucial role in whipping up the perfect brew. Let’s break down the essentials: malt, hops, and yeast.
Malt: The Backbone of Your Brew
Malt is where your beer gets its fermentable sugar. Think of it as the backbone of your brew. There are two main types: base malt and specialty malts. Base malt is your workhorse, while specialty malts add those unique flavors, mouthfeel, and color. If you’re using extract brewing methods, specialty malts can really jazz things up.
Malt extract, which comes in dried (powder) and liquid (syrup) forms, is concentrated sugar from malted barley. Depending on what kind of beer you’re aiming for, you can choose from pale, wheat, or amber malt extracts. For more nitty-gritty details, check out the American Homebrewers Association’s guide on homebrew ingredients.
| Malt Type | Flavor Profile | Use Cases |
|---|---|---|
| Base Malt | Mild, sweet | Main fermenter |
| Specialty Malt | Rich, complex | Flavor boost |
| Malt Extract | Concentrated sugars | Simplifies brewing |
Hops: The Spice of Beer
Hops are your go-to for adding balance, flavor, and aroma. They pack alpha and beta acids, plus essential oils that give beer its bitterness and aroma.
You can add hops at different stages of brewing. Dry hopping, which means adding hops after fermentation, can really amp up the aroma and flavor. Knowing which hops to use can make or break your brew. For more on hops, check out the American Homebrewers Association’s info on homebrew ingredients.
| Hop Type | Flavor/Aroma | Use Case |
|---|---|---|
| Bittering Hops | High bitterness | Early in the boil |
| Aroma Hops | Floral, fruity | Late in the boil |
| Dry Hops | Enhanced aroma | After fermentation |
Yeast: The Magic Maker
Yeast is the unsung hero of fermentation, munching on the sugars in the wort and spitting out alcohol and carbon dioxide. Your choice of yeast—ale or lager—can totally change the flavor and character of your beer.
Brewer’s yeast is the standard, but wild yeast and bacteria can add some wild flavors. Just keep things clean to avoid any funky cross-contamination, especially when you’re experimenting. For more on yeast and fermentation, check out the American Homebrewers Association’s guide on homebrew ingredients.
| Yeast Type | Characteristics | Best Use |
|---|---|---|
| Ale Yeast | Fruity, estery | Warm fermentation |
| Lager Yeast | Clean, crisp | Cool fermentation |
| Wild Yeast | Unique flavors | Experimental brewing |
By getting to know malt, hops, and yeast, I found I could brew beers that hit the spot. As I kept exploring homebrewing, I loved crafting my own unique brews. If you’re itching to start, grab a home beer making kit to make things easier.

The Brewing Process
Starting your homebrewing adventure means getting a grip on the brewing process. Let’s walk through fermentation, bottling, carbonation, and the timeline for brewing your first batch of beer.
Step-by-Step Fermentation
Fermentation is where the magic happens. Yeast munches on the sugars in the wort, turning them into alcohol and carbon dioxide (CO?). This is what makes your wort into beer.
Fermentation Begins: Within a day or two, you’ll see signs of fermentation. Yeast is a bit unpredictable, so it might take up to three days.
Fermentation in Action: As yeast does its thing, bubbles form on the wort’s surface. The airlock will bounce as CO? escapes. Thick foam, called krausen, will appear and then sink back into the beer over the next few days (MoreBeer).
Fermentation Wraps Up: Usually, fermentation takes about 7-10 days. You’ll know it’s ready to bottle when the airlock shows no activity for three days. You can also check the specific gravity with a hydrometer for brewing. If it stays the same for three days, it’s bottling time.
Bottling and Carbonation
Bottling is where your beer gets ready for the big show. It’s transferred into bottles, and carbonation kicks in.
Get Ready: Before bottling, sanitize everything, including the bottling bucket with spigot and bottles. This keeps your beer safe from contamination (homebrewing sanitation).
Natural Carbonation: To carbonate, add a bit of sugar to the beer before sealing it in bottles. The leftover yeast eats this sugar and produces CO?, which carbonates your beer.
| Bottling Step | Action |
|---|---|
| Sanitize | Clean all equipment thoroughly |
| Transfer | Use a bottling wand to fill bottles |
| Add Sugar | Mix a priming solution for carbonation |
| Cap | Seal bottles using a bottle capper for homebrewing |
Brewing Timeline
Knowing the timeline helps keep your brewing on track. Here’s a general overview:
| Stage | Duration |
|---|---|
| Fermentation | 7-10 days |
| Bottling | 1 day |
| Carbonation | 1-2 weeks |
| Total Time | 2-3 weeks before tasting |
After bottling, let your beer carbonate for about 1-2 weeks. It’s tempting to taste it early, but patience pays off. Once carbonated, chill, pour, and enjoy your hard work!
With this guide, I hope your brewing experience is fun and successful. Each brew day is a chance to learn and get better. For more on the gear you’ll need, check out our section on homebrewing equipment. Happy brewing!
Tips for Beginners
Starting out in homebrewing? I’ve got some golden nuggets to share. From picking the right starter kits to mingling with fellow brewers, these tips will make your brewing adventure a breeze.
Recipe Kit Recommendations
If you’re just dipping your toes into homebrewing, grab a homebrew starter set or a beginner ingredient kit. These kits come with step-by-step instructions and all the basics you need. Steer clear of “partial mash” or “all grain” kits for now—they’re a bit more complicated and need extra know-how (Serious Eats).
| Kit Type | Batch Size | Difficulty Level |
|---|---|---|
| Beginner Ingredient Kit | 5 gallons | Easy |
| Extract Brewing Kit | 1 – 5 gallons | Easy |
| Partial Mash Kit | 5 gallons | Moderate |
| All Grain Kit | 5 – 10 gallons | Advanced |
Starting small, like with a 1-gallon batch, is a smart move. It lets you play around with different recipes and techniques without committing to a huge amount.
Joining Homebrewing Communities
Hooking up with other homebrewers is a game-changer. Online communities like HomeBrew Talk are treasure troves of info. You’ll find tutorials, videos, and discussions to help you through the brewing process, solve problems, and spark ideas for future brews. Plus, chatting with seasoned brewers can boost your confidence as you get the hang of things.
Experimenting with Extract Brewing
Extract brewing is a fantastic way to kick off your brewing journey. It’s beginner-friendly because it gives you fermentable sugars in syrup or powdered form, so you can focus on fermentation and flavoring without needing a ton of gear or expertise (Hazy and Hoppy).
This method lets you get creative with flavors while keeping things manageable. And who knows? You might end up brewing an award-winning beer right out of the gate.
By following these tips and tapping into available resources, your path from newbie to seasoned brewer will be fun and fulfilling. Whether you’re picking the right kit, joining a community, or diving into extract brewing, each step brings you closer to mastering the craft of homebrewing.